

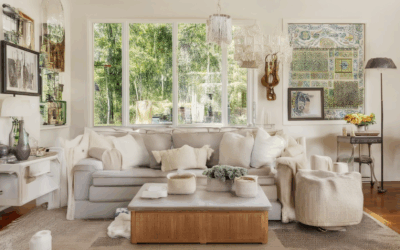
Unlock your creative potential and transform your space with innovative wall art ideas that go beyond ordinary decor. Whether you’re aiming for a cozy living room, a stylish bedroom, or a striking focal point in any room, unique wall art offers endless possibilities. From using stencils and paint to experimenting with everyday materials like cardboard, the options are vast and diverse. Discover how to create one-of-a-kind pieces that reflect your personal style and elevate your surroundings. Explore tips, tricks, and techniques to design wall art that stands out, blending creativity with functionality to turn plain walls into artistic masterpieces.
Creating Unique Wall Art with Stencils and Paint: A Step-by-Step Guide
Materials Needed:
– High-quality acrylic paints (Golden, Liquitex)
– Water-based or oil-based primer
– Medium-grit sandpaper
– Reusable Mylar stencils with fine details
– Brushes: Flat brush for large areas, detail brush for precision
– Sponges for blending and texture
– Palette knife (optional for texture)
– Protective gear: Gloves and eye protection
– Spray bottle for misting paint
– Picture hooks or frames
Preparation:
1. Clean and Prepare the Wall: Remove dust and dirt, sand edges and corners for a smooth surface.
2. Apply Primer: Use a primer suited to your wall type for better paint adhesion and a smooth base.
Base Layer:
1. Start with a Solid Color: Use a broad brush to apply a base coat, allowing it to dry completely for optimal adhesion.
Stencil Application:
1. Position Stencils Firmly: Place stencils against the wet paint, applying steady pressure to ensure paint adheres through stencil openings.
2. Practice First: Test on a small area to master stencil placement and pressure.
Dry Brushing:
1. Enhance Texture: Lightly dry brush over the design to blend edges and create a seamless look.
Blending and Layers:
1. Use Sponge for Blending: Swirl a sponge over wet paint to create texture and blend colors.
2. Add Depth: Apply a second paint layer over stenciled areas for vibrancy and depth.
Spray Misting:
1. Finish with Misting: Lightly mist the painted area with water to enhance texture and settle pigments.
Finishing Touches:
1. Seal with Protective Coating: Apply a clear polyurethane to preserve the artwork.
2. Hang Properly: Use picture hooks or frames matching your decor for secure display.
Additional Tips:
– Test Designs: Try on a small, less noticeable area first.
– Experiment with Texture: Use palette knives for added depth.
– Play with Colors: Start with monochromatic tones, then introduce brighter or metallic colors.
Conclusion:
By following these steps, you can transform your space with unique, detailed wall art using stencils and paint. Embrace patience, experimentation, and enjoy the creative journey!
Creating One-of-a-Kind Wall Art Ideas
Transform your space with unique wall art that reflects your personality and style. Here are some creative ideas to get you started:
- Recycled Collage: Gather unwanted cardboard, fabric scraps, or paper pieces and arrange them into a visually appealing collage. Use glue, tape, or modular adhesives to secure the pieces in place.
- 3D Elements: Incorporate texture by adding materials like metal sheets, wooden planks, or resin casts. These can be glued or nailed onto the wall art for added dimensionality.
- Lighting Features: Enhance your design with LED strips or string lights embedded behind the artwork for a glowing effect. Ensure they are weather-resistant if near windows.
- Custom Colors: Use spray paint or acrylics to create vibrant, custom hues. Match the colors to your room decor for a cohesive look, or experiment with unexpected color combinations for a striking visual impact.
- Personalized Pieces: Display meaningful objects, photographs, or memorabilia arranged in a narrative or thematic sequence. Consider adding captions or dates to tell a story.
- Nature-Inspired Art: Create wall art featuring natural elements like leaves, trees, or flowers. Print large-scale images or paint freehand for a serene, organic aesthetic.
- Abstract Designs: Opt for abstract art that challenges traditional forms. Use paint, ink, or stencils to create shapes, patterns, or textures that evoke emotion and curiosity.
Remember to secure your wall art safely. Use wall-safe adhesives and ensure heavy pieces are properly anchored to prevent damage. Plan your layout ahead of time to account for spacing and alignment. With these ideas, you’ll create a truly unique and memorable centerpiece for your home!
Creating Unique Wall Art with Stencils and Paint
To craft distinctive wall art using stencils and paint, follow these organized steps for a polished finish:
- Materials Needed: – Acrylic paint (Golden or Liquitex recommended for durability) – High-quality primer (for textured walls or uneven surfaces) – Fine-grit sandpaper (120-150 grit) – Reusable Mylar stencils (various designs available) – Flat brush, detail brush, and sponge – Paper towels or lint-free cloth – Rags – Safety glasses and gloves – Sealer or varnish (polyurethane sealant recommended)
- Preparation: – Clean and prepare the wall surface by removing dust and dirt. – Sand the wall to ensure a smooth surface, especially if using texture or pattern stencils. – Apply a high-adhesion primer to create a base for the paint to adhere properly.
- Technique 1: Layering Colors – Start by applying a base color using a flat brush for coverage. – Once dry, use stencils to add details, working with light pressure to avoid bleeding. – Layer additional colors over the stencils for depth and dimension.
- Technique 2: Overlapping Stencils – For added texture, overlap stencils slightly and apply paint in between. – This creates a more dynamic and interesting visual effect.
- Blending and Finishing: – Use a sponge or paper towel dampened with water to blend colors and soften edges. – Allow the artwork to fully dry between layers to ensure adhesion. – Once completely dry, apply a clear sealer to protect the artwork and enhance its longevity.
- Design Inspiration: – Look for inspiration in nature, art, and interior design magazines. – Mix colors on a palette to create unique hues and tones. – Consider the placement of your artwork to complement your space’s lighting and furniture arrangement.
- Common Mistakes to Avoid: – Rushing the drying process, which can lead to peeling. – Using low-quality paint or thinners that may not adhere well. – Overloading the stencil with paint, causing it to lift later.
By following these steps and paying attention to detail, you can transform any wall into a captivating piece of art that stands out. Experiment with different techniques and designs to create a truly unique and professional-looking finish.
Transform Your Space with Unique Wall Art Made from Cardboard and Paint
Creating unique wall art from everyday materials like cardboard and paint is a fun and eco-friendly way to decorate your space. With a bit of imagination and some basic tools, you can craft personalized designs that truly stand out.
Step-by-Step Guide to Crafting Unique Wall Art
- Choose Your Materials: Gather cardboard boxes, sheets of paper, paint, paintbrushes, and scissors. These materials are readily available and often found lying around the house.
- Design Your Vision: Sketch out your ideas on paper or visualize them in your mind. Consider shapes, patterns, and colors that reflect your personality or the space’s vibe.
- Cut Out Shapes: Use scissors or a utility knife to cut out interesting shapes from the cardboard. Think about geometric forms, letters, or abstract designs.
- Add Texture with Stencils: Create stencils from paper or cardboard to transfer patterns onto your painted surfaces. This adds depth and visual interest to your wall art.
- Layer Paint for Dimension: Apply multiple layers of paint in different shades and textures. This technique can mimic wood grain, create gradients, or give a weathered look.
- Personalize with Words or Quotes: Paint meaningful words, phrases, or quotes on your designs to give them a personal touch. This makes each piece completely unique.
- Combine Materials for Extra Depth: Mix in other materials like fabric, beads, or feathers to add texture and color. This can transform simple shapes into something extraordinary.
- Frame or Display Raw Edges: Decide whether to frame your pieces for a polished look or leave edges raw for an industrial aesthetic. Both options can complement different styles of decor.
- Arrange and Hang: Group smaller pieces together for a cohesive display or hang individual pieces in a grid. Consider placing them in areas that need some life, like above the couch or near windows.
- Seal for Longevity: To protect your artwork and ensure it lasts, apply a clear sealant or varnish. This prevents fading and keeps your designs looking vibrant.
By experimenting with these techniques, you can create wall art that’s as unique as your personality. Whether you prefer bold statements or subtle accents, cardboard and paint offer endless possibilities for transforming your space into a visually stunning environment.
Transform Your Space with Unique Wall Art Ideas
Creating unique wall art involves experimenting with unexpected materials, innovative textures, and daring color combinations to turn any room into a personalized artistic showcase. Here’s how you can achieve this:
- Material Exploration: Step outside the norm by using unconventional materials like cardboard, wood, fabric, or even metal. These mediums offer distinct textures that add character to your walls.
- Texture Innovation: Enhance your designs with varied textures. Use sandpaper for a rough finish, stencils for patterns, or layer different materials for a multi-dimensional effect.
- Bold Color Palettes: Opt for vibrant, contrasting hues. Consider gradients, neon colors, or metallic paints to create eye-catching displays that stand out.
- Application Techniques: Experiment with different techniques like spray painting for abstract effects, brushwork for controlled designs, or sponge painting for soft textures.
- Material Combination: Combine materials physically, such as attaching wood, metal, or plastic pieces to create depth and dimensionality. Use found objects for a collage-like aesthetic.
- Arrangement and Theme: Arrange your pieces in a grid for a modern look or cluster them for an eclectic vibe. Choose a unifying theme, like travel, nature, or abstract concepts, to tie your designs together.
- Lighting Effects: Consider how lighting interacts with your materials. Some surfaces may shimmer under certain lights, adding depth to your artwork.
By following these steps, you can transform any space into a personalized artistic display that’s truly unique and memorable.
Transform Your Space with Unique Wall Art Made from Cardboard and Paint
Creating unique wall art from everyday materials like cardboard and paint is a fun and eco-friendly way to decorate your space. With a bit of imagination and some basic tools, you can craft personalized designs that truly stand out.
Step-by-Step Guide to Crafting Unique Wall Art
- Choose Your Materials: Gather cardboard boxes, sheets of paper, paint, paintbrushes, and scissors. These materials are readily available and often found lying around the house.
- Design Your Vision: Sketch out your ideas on paper or visualize them in your mind. Consider shapes, patterns, and colors that reflect your personality or the space’s vibe.
- Cut Out Shapes: Use scissors or a utility knife to cut out interesting shapes from the cardboard. Think about geometric forms, letters, or abstract designs.
- Add Texture with Stencils: Create stencils from paper or cardboard to transfer patterns onto your painted surfaces. This adds depth and visual interest to your wall art.
- Layer Paint for Dimension: Apply multiple layers of paint in different shades and textures. This technique can mimic wood grain, create gradients, or give a weathered look.
- Personalize with Words or Quotes: Paint meaningful words, phrases, or quotes on your designs to give them a personal touch. This makes each piece completely unique.
- Combine Materials for Extra Depth: Mix in other materials like fabric, beads, or feathers to add texture and color. This can transform simple shapes into something extraordinary.
- Frame or Display Raw Edges: Decide whether to frame your pieces for a polished look or leave edges raw for an industrial aesthetic. Both options can complement different styles of decor.
- Arrange and Hang: Group smaller pieces together for a cohesive display or hang individual pieces in a grid. Consider placing them in areas that need some life, like above the couch or near windows.
- Seal for Longevity: To protect your artwork and ensure it lasts, apply a clear sealant or varnish. This prevents fading and keeps your designs looking vibrant.
By experimenting with these techniques, you can create wall art that’s as unique as your personality. Whether you prefer bold statements or subtle accents, cardboard and paint offer endless possibilities for transforming your space into a visually stunning environment.
Creating Unique Wall Art with Stencils and Paint
To craft distinctive wall art using stencils and paint, follow these organized steps for a polished finish:
Materials Needed
- Paint: High-quality acrylic paints (e.g., Golden, Liquitex) in your preferred colors
- Primers: Water-based or oil-based primer suitable for your wall type
- Sandpaper: Medium-grit sandpaper for smoothing textures
- Stencils: Reusable Mylar stencils with fine details
- Brushes: Flat brush for large areas, detail brush for precision
- Sponges: For blending and texture application
- Palette Knife: Optional for creating texture effects
- Protective Gear: Gloves and eye protection
- Tools: Spray bottle for misting paint
Techniques to Achieve a Professional Look
- Preparation: Clean and prepare the wall surface. Sand edges and corners. Apply primer according to instructions for a smooth base.
- Base Layer: Start with a solid base color using a broad brush. Allow it to dry completely for optimal adhesion.
- Stencil Application: Position stencils firmly against the wet paint. Use a steady hand to apply pressure, ensuring paint adheres through the stencil openings.
- Dry Brushing: After stenciling, lightly dry brush over the design to enhance texture and blend edges seamlessly.
- Blending and Layers: Use a sponge to blend colors or add texture. Apply a second layer of paint over the stenciled areas for depth and vibrancy.
- Spray Misting: Lightly mist the painted area with water to allow the paint to settle and create a professional finish.
Finishing Touches
- Sealing: Protect your artwork with a clear protective coating (e.g., polyurethane)
- Hanging: Use picture hooks or frames suited to your decor for secure display
Additional Tips
- Test your design on a small sample area first.
- Consider using texture sprays or palette knives for added dimension.
- Experiment with color combinations to achieve a unique aesthetic.
Conclusion
Your creativity knows no bounds with these techniques. By combining stencils and paint thoughtfully, you can transform any wall into a stunning piece of art that stands out. Happy crafting!

0 Comments